
Using jsPDF to create a personalised certificate within Articulate Storyline
Creating a printable certificate at the end of a storyline project should be simple. After spending too much time exploring articles on this topic, I decided to write my own. The easiest method is the ‘print screen’ function within Articulate Storyline. I’ve found this doesn’t always work as desired.
The best solution I’ve found is to use the jsPDF library. The code I’ve worked on and enhanced was presented by Devlin Peck. I’ve updated the code to move away from old JavaScript methods. Out of the box, this code doesn’t work well for custom fonts and needs some alterations.
You’ll find the code I used to make the certificate that prints at the end of the LinkedIn Quiz App project, below. This is followed by details of how you can customise the code to fit your project. After the code, I explain how you can customise important settings for your own project.
//This part of the code sets up a variable that will set today's date
let date = new Date();
const dd = String(date.getDate()).padStart(2, '0');
const mm = String(date.getMonth() + 1).padStart(2, '0');
const yyyy = date.getFullYear();
date = dd + '/' + mm + '/' + yyyy;
//This section begins pulling the variables you will need from Articulate Storyline
const player = GetPlayer();
const userName = player.GetVar("UserName"); // This line calls the UserName - you should use the variable that you've set within your project.
const score = player.GetVar("PercentageScore") + "%"; // If you want to include the users percentage score, you will need to call the variable from Articulate Storyline (Note you will have to setup the calculations either with Articulate Storyline Triggers, or via JavaScript.
//This section starts the jsPDF libary - Note there is some additional code you will need to add within the story.html document - see below.
const doc = new jsPDF({
orientation: 'landscape'
}); //(See Note 2 - below)
const img = new Image;
img.onload = function() {
doc.addImage(this, 0, 0, 297, 210);
//(See Note 3 - below)
doc.setFontSize(36);
doc.setTextColor(11, 92, 168);
doc.setFont('Bellota-Bold', 'bold');
doc.text(userName, 12.6, 91, null, null, 'left');
doc.setFont('MontserratAlternates-Medium', 'normal');
doc.setFontSize(20);
doc.setTextColor(107, 163, 95);
doc.text(score, 71.5, 131, null, null, 'left');
doc.setFontSize(16);
doc.text(date, 108, 178, null, null, 'left');
doc.save(`${userName}-Certificate.pdf`);
};
img.crossOrigin = "";
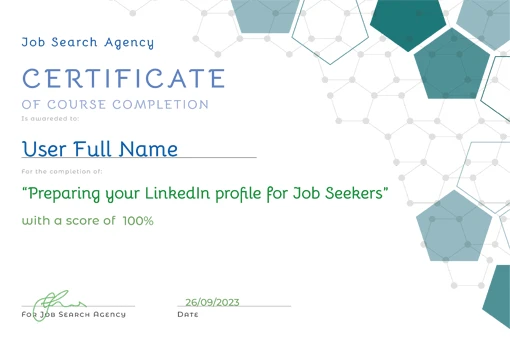
img.src = "Certificate-JobSearchAgency.png"; This Code produces this Certificate.
How to Customise the Code
Design your certificate
For this project, I downloaded a certificate base from freepik.com. I customised it in Illustrator and set it up on A4 Landscape. I added the text I wanted to include and then saved the image as a ‘.png’ file. As you can see from the last line of the code, I called my certificate “Certificate-JobSearchAgency.png”.
Your certificate can take any standard paper size, International or US sizes. The important thing is the paper size you choose should reflect what your users will print on. You could as an alternative set this up for both US and International paper sizes.
Note 2 – Setting the Format of the Certificate
As a rule, jsPDF uses A4 and millimetres (mm) for measurements, in the Portrait (P) orientation. However, it can also cope with many different sizes and formats of standard paper. It can also work in a range of standard measurements. The important thing is if you want to use something else you need to code this in at (Note Point 1.) You may find this site useful to view paper sizes with their measurements in various formats, including millimetres and inches – papersizes.io
Some standard examples are given below:
A4 – Portrait – 210 x 297 – mm
const doc = new jsPDF({
});
This is the standard settings for jsPDF – A4 Portrait in millimetres (mm)
A4 – Landscape – 297 x 210 – mm
const doc = new jsPDF({
  orientation: 'landscape'
});
This is the same as the example above.
Letter – Landscape – 279 x 216 – mm or 11 x 8.5 – inches
const doc = new jsPDF({
  orientation: 'portrait',
  format: 'letter',
});
The code above is for US Letter paper, but you will need to use mm as the unit. If you prefer to use inches, use the code below.
const doc = new jsPDF({
  orientation: 'portrait',
  unit: 'in', //in is for inches
  format: 'letter',
});
Letter – Landscape – 279 x 216 – mm or 11 x 8.5 – inches
const doc = new jsPDF({
  orientation: 'landscape',
  format: 'letter',
});
The code above is for US Letter paper, but you will need to use mm as the unit. If you prefer to use inches, use the code below.
const doc = new jsPDF({
  orientation: 'landscape',
  unit: 'in', //in is for inches
  format: 'letter',
});
Setting the Dimensions of the Certificate
doc.addImage(this, 0, 0, 297, 210);Here you will want to put the dimensions of your certificate into this line at the end. If you’re using A4 Portrait then you switch the 297 and 210 so that it is… 0, 0, 210, 297. You can find the other measurements above. Remember to keep them in the unit you’ve selected. The default is mm.
Note 3 – Setting up the Personalised Font(s)
In this block, you will find the details to prepare the personalised fonts.
It’s likely that you’ve already selected your fonts. You’ve probably used them within your course or at least on your certificate. You will need to find the TTF files for the font. If you’re using Google Fonts you can download the ttf files directly from Google Fonts website.
You will then want to convert these to a javascript file. This is the best site to do it on www.rawgit.com/MrRio/…
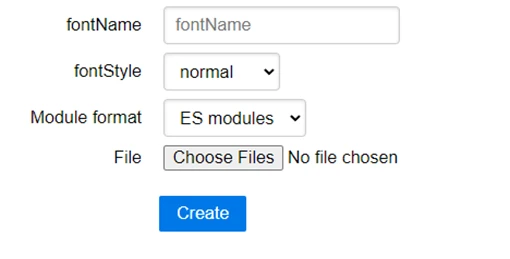
Click on the choose files and select the .tff file for your font. To make your life easier leave “fontStyle” as normal. This will simply affect the name of the new file. This will automatically generate a new javaScript file. Your new file will be named in the form ‘yourFont.js’ so something like this MontserratAlternates-Medium.js.
Open this file using a code editing package, like VS Code.
You need to change a few lines, firstly:
import { jsPDF } from "jspdf"becomes:
(function (jsPDFAPI) {Then at the bottom of the code, you’ll find this section.
var callAddFont = function () {
this.addFileToVFS('Bellota-Bold-normal.ttf', font);
this.addFont('Bellota-Bold-normal.ttf', 'Bellota-Bold', 'normal');
};
jsPDF.API.events.push(['addFonts', callAddFont])
Note you just need to change the old line 7 to the new lines 7 and 8. Don’t overwrite lines 3 to 6 as these will not work with your new font. You’ll leave your font information in there.
var callAddFont = function () {
this.addFileToVFS('Bellota-Bold-bold.ttf', font);
this.addFont('Bellota-Bold-bold.ttf', 'Bellota-Bold', 'bold');
};
jsPDFAPI.events.push(['addFonts', callAddFont])
 })(jsPDF.API);
Now save the file and exit. You’ve got your fonts all setup ready to be used.
Setting up the Text to Add
This section deals with setting up the text you will add to the certificate a row at a time
doc.setFontSize(36);
doc.setTextColor(11, 92, 168);
doc.setFont('Bellota-Bold', 'bold');
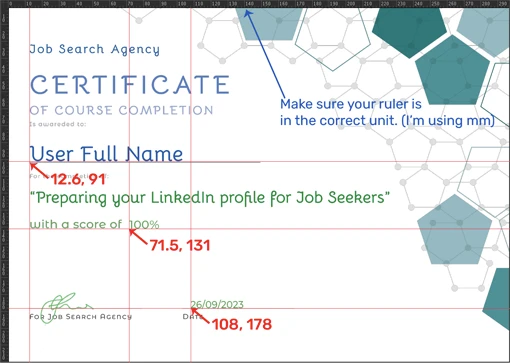
doc.text(userName, 12.6, 91, null, null, 'left'); Here you put the font size you want to use in line 20.
The Text Colour you can set in RGB (red green blue), white is 255, 255, 255 and black is 0, 0, 0
Set the font to your font, and replace ‘Bellota-Bold’ with the file name of your font. If you didn’t change the FontStyle from Normal, replace the ‘bold’ with ‘normal’.
In the last line change the values 12.6 and 91 to where you want the userName to appear on your certificate. You can also change the alignment from ‘left’ to ‘right’ to ‘center’. Be aware that doing this you will need to alter the position values to take account of the alignment.
The image below should show you how to work out what those values are.
If you’re adding more additional text then add them on additional lines. You only need to repeat the first three rows if you’re changing the font size, text color, and font. Otherwise, you can simply use single line, doc.text…
In the original code, I have three text points. The last two use the same font and text color and so those lines are not repeated.
Note 4 – Locating your certificate image and setting up the new file name
   doc.save(`${userName}-Certificate.pdf`);
  };
img.crossOrigin = "";
img.src = "Certificate-JobSearchAgency.png";
The final certificate will be called by the username-certificate.pdf. You can change this to whatever you like. This will draw on the variable name userName that you pulled in.
Make sure you change line 37 to the name of the certificate that you created and saved as a png file.
Add the code and Publish
Add the JavaScript to the appropriate trigger in your storyline project and publish the project.
The last few things to do:
- Open the folder the File Explorer. Move your certificate.png file, and all yourFont.js files into the main project root folder.
- Look for the story.html file and open it with VS Code – add the following lines at the bottom of the file after the </body> tag
Note replace the names of the font files with the fonts you’ve used.
<script src="https://cdnjs.cloudflare.com/ajax/libs/jspdf/1.5.3/jspdf.debug.js" integrity="sha384-NaWTHo/8YCBYJ59830LTz/P4aQZK1sS0SneOgAvhsIl3zBu8r9RevNg5lHCHAuQ/" crossorigin="anonymous"></script>
<script src="Bellota-Bold-bold.js"></script>
<script src="MontserratAlternates-Medium-normal.js"></script>
One Last Thing
Generally, you can not run this locally. You will need to upload it to a web server, or web file storage area. I recommend this video by Tim Slade if you want to know how to do it.